October 29, 2009

Blogger Template | sGallery Grunge Style


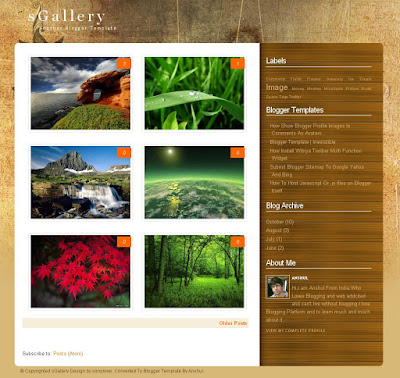
Hi friends as its fast i am releasing my another blogger template and this time a gallery one.As i have seen many high quality gallery templates are being released by many bloggers, so i thought why not design a gallery template too, as i have not yet designed any gallery theme for you.But don't worry a premium gallery template of mine is under designing which i will release later after its completion.So for now you can use this sgallery blogger template,which is also of high quality.As my first impression of seeing it at wordpress was simple and beauty and third one very easy conversion to blogger.As i have only changed few codes of blogger html including colors and images and added gallery hack.

As you have seen all my previous templates were magazine styles but the last one which i released was irresistible by far my best conversion.Don't forget to check it for sure.Now lets see our sGallery blogger template.


Features Of sGallery Blogger Template


  • Gallery Style

  • Blogger Avatars Installed

  • Fixed Width Template

  • Right Sidebar

  • Compatible With Mozilla, Chrome and IE7

  • Show Of Your Favourite Photos

  • Support All Blogger Features

  • Top Comment Bubble


sGallery Template Installation


  • Changing Thumbnail

  • I have added one extra feature in it.As some bloggers have no images in previous blogger posts and when they install template the text seems to appear in place of images and template looks bad.So i have added one image in hack so that it will show up automatically for all your posts which do not contain images.

    The image link is

    http://2.bp.blogspot.com/_j82W7u9kZbs/Sukp7en5B9I/AAAAAAAAAPg/2PnEl4-nZ38/s400/nothumb.jpg


    You can find it in codes and change it with any other image if you dont like this image.You can test it by doing post with only text,this image will show up for it in that post.

    If i left something that you need more while installation of template or something where i got wrong in explaination or made complex let me know.


Donate If You Like The Work


If You Really liked our work and want us to continue provide these premium templates for free, Then support us by donating something you feel for this design by using paypal button in my sidebar.

October 26, 2009

How Show Blogger Profile Images In Comments As Avatars


How To Show Blogger Profile Images In Blogger Comments.As many of us bloggers saying it as showing of avatars in blogger comments but they are not avatars, they are just your blogger profile images and many readers also get mistaken by it, But they are right to say them as avatars, as they are like avatars for our bloggers.As it has been near about an month blogger has released this feature and i have found most of the bloggers also using this in there blogs.But some still have problems and not have made the solution for blank spaces in comments for anonymous comments.So i would like to hold a complete detailed tutorial on it.The below picture show up how profile images show up in blog as i have taken this snapshot from my blog after implementing this hack.


Now How to enable the blogger profile images in blogger comments.

First of all Go to Blogger > Settings > Comments and enable “Show profile images on comment”


If you are using default blogger templates then they get enabled and profile images will start up to show in blogger comments.They can also start up to show up in some customized templates but it depends at to what extent there comment section been customized or not.

Some Of The Problems You Wouldn't Like even after Enabling Profile Images In Default Template.


There will be two major problems in it.

1)The bloggers who don't have uploaded there profile images to there profiles while comments will show up a blogger favicon of size 16x16 like below.It doesn't look good from my point of view because the blogger profile images show up a picture of size 35x35.


2) The bloggers who do comments with there blog urls or anonymous comments will end up with a blank space in comments.That looks really awkward.It destroys the beauty of comment system as you can see from below image.


I have shown all the 2 problems in above picture as i hope it will be clear to you right now.Now we need to solve these problems.But first i would like to tell you about how to enable profile images in comments in blogs who are using customized templates, just what they they need is to edit small bit of codes in there blogger html.Now carry on with this tutorial.

How Enable Blogger Profile images In Customized Templates


First of all enable the feature of profile images in your blogger settings as i showed above.Now check your comments.If it shows up blogger profile images in comments,then its ok else follow next step.

First step Go to Blogger Layout >Edit HTML and backup your template.Now Expand the widget templates and check if you can find this line there


<dl expr:class='data:post.avatarIndentClass' id='comments-block'>


If you don't find above line then find below line:-


<dl id='comments-block'>


And replace it with the above line which you didn't found in your codes.

And if you still not able to find the above line you may get this one:-


<div id='comments-block'>


And replace it with the top most line which you didn't found initially.

Now find this line in code:-


<a expr:name='data:comment.anchorName'/>


And replace it with below codes.


<b:if cond='data:comment.favicon'>
<img expr:src='data:comment.favicon' height='16px' style='margin-bottom:-2px;' width='16px'/>
</b:if>
<a expr:name='data:comment.anchorName'/>
<b:if cond='data:blog.enabledCommentProfileImages'>
<div expr:class='data:comment.avatarContainerClass'>
<data:comment.authorAvatarImage/>
</div>
</b:if>


If you are using the author comment highlighting trick then you can get this code <a expr:name='data:comment.anchorName'/> once more in your template but not necessary.So replace it also with above codes.

Now Save your template and you will be now able to see blogger profile images in your comments as i showed above in picture but with the two problems of showing favicon of small size and blank space for anonymous and other url comments.

Solution For The Problem


What we need is now to resize the blogger favicon to the size of blogger profile images and we need one more image for showing up for anonymous and url comments.As Soufiane from LeBlogger was the first to come out with the solution and helping us.

Now Just Go to blogger edit/Html and find for ]]></b:skin> tag and place the below css codes before it.


/* Avatar */
.avatar-image-container img {
background:url(http://www.gravatar.com/avatar/ad516503a11cd5ca435acc9bb6523536?s=35);
width:35px;
height:35px;
}


You can just edit the image link, height and width in above css codes as you like.

Save it, You're done.

Now The the above image will be shown up for anonymous and url comments and favicon will be resized to width and height of size as you set as above in css codes.Now check how the better comments look as compared to above i shown.


I am sure now you will have no problems in implementing this in your blogs.If still you have some problems leave your comments i will try to solve them.Best Of Luck !

As i have been seeing that some of the bloggers are not getting this line <a expr:name='data:comment.anchorName'/> in there codes.So i wanna tell you one thing i.e the complete codes which enable profile images to be placed in the blogger.Just you have to place these codes in blogger, i think they might also can help you.


<dl expr:class='data:post.avatarIndentClass' id='comment'>
<dt expr:class='&quot;comment-author &quot; + data:comment.authorClass' expr:id='data:comment.anchorName'>
<b:if cond='data:comment.favicon'>
<img expr:src='data:comment.favicon' height='16px' style='margin-bottom:-2px;' width='16px'/>
</b:if>
<a expr:name='data:comment.anchorName'/>
<b:if cond='data:blog.enabledCommentProfileImages'>
<div expr:class='data:comment.avatarContainerClass'>
<data:comment.authorAvatarImage/>
</div>
</b:if>
</dt>
</dl>


If you will put this codes in place of the code i told you find in beggining of tutorial that is the comment-block one the hack will also work, just you have to adjust the closing of div tags or dl or dt tags depends what have been defined in your template codes.

And if still you not able to do it and want to enable it,just invite me to your blog at my id anshulaffprg[at]gmail.com and i will do it in 5 minutes for you as i get admin to it.

October 25, 2009

Blogger Template | Irresistible


Hi Friends, Its long i have not released any blogger template for you as me too was not able to update my blog from long time.So a template after a such long time should be premium blogger template, so that every reader of mine should like it and can use it on there blogs.I wanted it to be so good that every viewer of it should get impressed with the design so much that he/she can't wait to switch to this theme.Don't worry it will be going to free but not less than premium template.I have tried my best to make it look best and work with full functionality as like wordpress.Speciality about this template will be that i am releasing this template into all 9 colors available in irresistible with an easy change of only 3 colors with blogger fonts and colors tool.Now i think you should watch an demo of it for sure.


Just Don't Forget To Check All The Colors Available For This Template From Fixed Drop Down Menu at Top Right Of Demo Blog.

Features Of Irresistible Blogger Template


  • Fixed Width Template

  • Full Magazine Style Template

  • Three Column Blogger Template

  • Right Sidebar

  • Nine Colors Background

  • Multilevel Menu Links

  • Compatible With Mozilla, Chrome and IE7

  • Three Tabber Widgets

  • Search Box Ready

  • Beautiful Comment System

  • Show Of Your Favourite Photos And Video

  • Support All Blogger Features

  • 125 x 125 adds Widget


Hacks Supported By Template


Layout Of Irresistible Blogger Template


Click The image to View Large


Now after uploading this template you would get the layout look like this in your blog.

Irresistible Template Installation


  • Top Menu Links For Blog


  • Find the below code and edit the Links and linking text with your own links and text.


    <ul class='nav' id='nav'>
    <li class='current_page_item'><a href='/'>Home</a></li>
    <li class='cat-item'><a href='http://www.anshuldudeja.com' title='Wordpress To Blogger'>Blogger Templates</a></li>
    <li class='cat-item'><a href='http://www.funnypictures.net.in' title='WP Blogger Themes'>Funny Pictures</a></li>
    <li class='cat-item'><a href='#'>Menu &#187;</a>
    <ul class='children'>

    <li class='cat-item'><a href='#'>Link 1</a>
    <ul class='children'>
    <li class='cat-item'><a href='#'>SubLink 1</a></li>
    <li class='cat-item'><a href='#'>SubLink 2</a></li>
    </ul>
    </li>
    <li class='cat-item'><a href='#'>Link 2</a></li>
    <li class='cat-item'><a href='#'>Link 3</a></li>
    </ul>
    </li>
    </ul>


    As you can see the links above are multi-level and you can have categories and its subcategories too placed in it, to make your menu deep to any level.All the Linking text above in red are Main Menu Items, In blue are Links in menu Itmes and in green are the Sublinks of Links Items.So you can make your top menu as you like.I am just explaining the format of defining it so that you can edit or make it very easily.

    Making of Menu links of your own.Just define below format first :-


    <ul class='nav' id='nav'>
    <li class='cat-item'><a href='#' title=''> Menu</a></li>
    <li class='cat-item'><a href='#' title=''> Menu1</a></li>
    <li class='cat-item'><a href='#' title=''> Menu2</a></li>
    </ul>


    This creates three menu links name Menu,Menu1,Menu2.Define any number of links within class nav to have more.This will create menu links.

    Now to create Links for the menu.Use this Format:-


    <ul class='children'>
    <li class='cat-item'><a href='#' title=''> Link1</a></li>
    <li class='cat-item'><a href='#' title=''> Link2</a></li>
    </ul>


    And place it below the link of menu for which they belong.Like it belongs to Menu1,so i will place them in this format i.e just after Menu1 Link.Now Menu1 Links will contain 2 links in it with name Link1 And Link2.


    <ul class='nav' id='nav'>
    <li class='cat-item'><a href='#' title=''> Menu</a></li>
    <li class='cat-item'><a href='#' title=''> Menu1</a></li>

    <ul class='children'>
    <li class='cat-item'><a href='#' title=''> Link1</a></li>
    <li class='cat-item'><a href='#' title=''> Link2</a></li>
    </ul>

    <li class='cat-item'><a href='#' title=''> Menu2</a></li>
    </ul>


    And still you want to have sublinks for Link1.Just add links after Link1 In this format.


    <ul class='nav' id='nav'>
    <li class='cat-item'><a href='#' title=''> Menu</a></li>
    <li class='cat-item'><a href='#' title=''> Menu1</a></li>

    <ul class='children'>
    <li class='cat-item'><a href='#' title=''> Link1</a></li>

    <ul class='children'>
    <li class='cat-item'><a href='#' title=''> Sublink1</a></li>
    <li class='cat-item'><a href='#' title=''> Subink2</a></li>
    </ul>

    <li class='cat-item'><a href='#' title=''> Link2</a></li>
    </ul>

    <li class='cat-item'><a href='#' title=''> Menu2</a></li>
    </ul>


    Now a Menu Will be created with 3 Menu items Menu , Menu1 , Menu2. Menu1 Contains 2 links Link1 , Link2. And Link1 contains 2 sublinks Sublink1 ,Sublink2.

    Its so simple to add these links if you know little bit about html and to newbies unaware of any html part can be complex.

  • Blogger Title And Description

  • Just find below codes :-

    <div id='logo'>
    <div class='titlewrapper'>
    <h1>
    <a href='/'>Demo - Irresistible</a>
    </h1>
    </div>
    <div class='descriptionwrapper'>
    <p class='description'><span>http://www.anshuldudeja.com</span></p>
    </div></div>

    And edit the text in red with title and in green with description.

  • Flickr Photos

  • Top widget of home page sidebar is flickr.I would like that you should use it for sure for keeping template beauty.Just how to add flickr photos now.Just have a flickr account if not, and upload your photos you like.

    Now just add the below script to the flickr widget from your blogger layout as you can see there with name My Photos.


    <script src="http://www.flickr.com/badge_code_v2.gne?count=10&display=latest&size=s&layout=x&source=user&user=XXXXXXXX@N04" type="text/javascript"></script>


    And just change the red text with the photo id of yours as you can see it on your photo links in your account.

  • Tabber Widget

  • As i have installed three tabbers in template and all working on one script.I have expanded the tabber script in blogger itself to work so as all of you can use it without bandwidth problems.So loading time of template can increase a bit.So if you not happy with it.Just take the script and upload to your own server and place it before the </head> tag in your template in below format.You will get the script with the download file of template.


    <script src='http://your-server-url/tabber.js' type='text/javascript'> </script>


    Just change the red url above with your server url.

    Note:-If you use tabber script in template of your own,don't forget to find and remove the script i have expanded in template.

  • 125x125 Sidebar Adds

  • You will find four 125x125 adds fixed in your template sidebar.Just eiher edit them with yours links and images or remove below codes completely if you don't want them.


    <div id='advert_125x125'>
    <a href='#'><img alt='1' border='0' height='125' src='http://www.themeforest.net/new/images/ms_referral_banners/GR_125x125.jpg' width='125'/></a>
    <a href='#'><img alt='1' border='0' height='125' src='http://www.themeforest.net/new/images/ms_referral_banners/TF_125x125.jpg' width='125'/></a>
    <a href='#'><img alt='1' border='0' height='125' src='http://www.themeforest.net/new/images/ms_referral_banners/VH_125x125.jpg' width='125'/></a>
    <a href='#'><img alt='1' border='0' height='125' src='http://www.themeforest.net/new/images/ms_referral_banners/125x125_AJ.jpg' width='125'/></a>
    </div>


  • Switching To Other Colors Of Template

  • Hi as i have released this theme in 9 colors,so i wanted that users can switch to any theme they like at any time they want.So i made the switching of the theme very easy and will take hardly a minute to give new look to your template.

    As i have given you css file for all 9 colors you can use any color css you like but at any time if you want to switch to other color you will try to upload other color css but this will effect all your widgets so just read simple instructions to switch to other color theme within a minute.

    Just check for below codes in your template.You will get them at the beggining of your template codes only.

    <Variable name="bgcolor" description="Page Background Color"
    type="color" default="#fff" value="#18191b">
    <Variable name="linkcolor" description="Link Color"
    type="color" default="#58a" value="#6099ff">
    <Variable name="textcolor" description="Text Color"
    type="color" default="#333" value="#a3d5ea">

    body#woothemes {
    background:$bgcolor url(http://3.bp.blogspot.com/_j82W7u9kZbs/Sqh3r8PhzRI/AAAAAAAAAJU/6s3whGZYO5U/s1600/bg.jpg) repeat-x center 0;
    color: #e9e9e9;
    font-family: Arial, Helvetica, sans-serif;
    font-size: 12px;
    line-height: 18px;
    }


    Just change the red values of three colors and one background image in your template with values contaied in the other color styles and and your new color theme is ready.It will hardly just take a minute.So Enjoy It and have 9 different themes in 9 days.

    If i left something that you need more while installation of template or something where i got wrong in explaination or made complex let me know.


Template Full Support


If You really liked the template and want full support for this template,just use the paypal button at my blog sidebar to appreciate my work and make my time worth,i spent on this template design.

October 19, 2009

How Install Wibiya Toolbar Multi Function Widget


Many of my readers are asking for the fixed widget,which i am having at the bottom of my blog.It is by far best widget with useful features for a blog and is available in different colors to suit your blog.Best part is,its very easy to add and customize,The simple thing you have to do is just go to wibiya.com and sign up your blog there.Then they will get you approve your blog in 3-4 days and you will be ready to get codes for this widget from there site.You can select on the which features you want in your blog from below list and also select color of widget to suit your blog.

Features Of Wibiya Widget

1. Translator

2. Posts Navigator (Recent Article and Random Article)

3. Community via Facebook

4. Twitter Widget

5. RSS Subscribers Bar

6. Sharing Bar

7. Blog Searches

8. Photo Gallery

9. Live Notifications

10. Facebook Fan Page

11. Games (HeyZap)


Now How to get this widget.Just go to Wibiya.com

Then click on the Getit now button.


Now give your details and request an invite.


Then you will get an message from them.


Just wait for getting approved your blog for some days and after approve they will send you the invite to your email,just use that invite to activate your account and get that widget codes.

How to install widget from your account now.

Now When you receive invitation,then click on the invitation link from your mail and login to your wibiya account.

Fill in the details they are asking for.

Then you will go through 4 steps Process.

1.Create A Account 2. Select A Theme 3. Select Your Apps 4. Get It Now.

Just In step 1 Give the desired Information they asked For.

In Second Step Select the theme i.e color for widget which suits your blogger template.As while choosing theme at the right you have an option of Choosing toolbar icon.Use bloggers or any other you like.


In Third Step Select The Applications you want in your widget.As i have written all application at the beggining of the post.

In fourth Step You will get page like below.Just select the paltform and allow the popup to open in your browser as it will directly give you add a widget option in one step.As many readers have problem in getting codes of the widget, so its the easy one.


And after adding widget Just Hit Done.And you are to your dashboard Page with all stats for your widget and also a notifier option is there to set an message for your visitor whenever he comes to your blog.You can set it if you want.


Problem Users Facing To Implement In Blogger

1.In Getting Codes For Blogger


In The Fourth Step When You Select The Platform To Install the widget, There are four options.
1.Wordpress
2.Blogger
3.Typepad
4.Other Sites

Just when we click for blogger a new window opens for one click add a widget to blog.So for this you have to allow pop ups.If you are still not getting codes just select option for typepad or last option then you will get the script and place it in your Html/javascript widget of your blog.

And for wordpress you will get the download link for plugin just download it and install it.

2.Slowing Down Of Blogger


As one of reader didn't used it because of slowing down the loading of blogger.As for this the dror cedor from wibiya.com gave a simple solution to it as you can read his comment here.

What exactly you have to do is that how to start the loading of widget after blog gets loaded.For this here is the simple solution.

The code which you will get to be placed in blogger will be like this.


<script src='http://toolbar.wibiya.com/toolbarLoader.php?toolbarId=XXXX' type='text/javascript'></script>


Now what you have to do is just add &pl=1 in your link after you toolbar id as i have assumed here to be XXXX and make whole code look like below :-


<script src='http://toolbar.wibiya.com/toolbarLoader.php?toolbarId=XXXX&pl=1' type='text/javascript'></script>


What i have done is just added red part in link. By adding this the widget will load only after when the blog gets loaded, which will not effect the loading of blogger.

*Note:-If you are adding the script in widget its ok.But if then you adding in blogger codes it will not accept the script after making changes.So just make it code friendly from this Encode tool.

I checked this and really it had no effect on loading speed of my blog now.

I hope now you will have now no problem in installing the widget.

October 10, 2009

Submit Blogger Sitemap To Google Yahoo And Bing


How to submit blogger sitemap to different search engines.I hope most of us have done it with there blogs but most still would be not knowing on how to do it.But this post is for all bloggers even if they have submitted there sitemaps as i would share some method to remove some errors while you are getting in indexing all blog posts in search engines.

How to Submit Blogger Sitemap to Google.

Follow the simple steps to add blogger blog to Webmaster Tools

1. Login to Blogger Dashboard.
2. At the end of the page, under Tools and Resources box – Click on Webmaster Tools.You will Be asked To Enable Webmaster Tool Enable It.
3. If asked, enter username and password again to Login.
4. After Logging in Click Add A site Button.


5.Now Enter Your Blog Address And Continue.Dont Forget To Include '/' At the end of your blog address.Like this http://www.anshuldudeja.com/ .
6.Now you will be asked to verify your blog Just verify it as they say.

7. Inside Webmaster tools, click on Submit a Sitemap and add the following code inside the box :


atom.xml?redirect=false&start-index=1&max-results=100


8. If you have more than 200 posts then replace value 100 by something bigger number like 500.If they are more than 500 then add sitemaps in this format.


atom.xml?redirect=false&start-index=1&max-results=500
atom.xml?redirect=false&start-index=501&max-results=500
atom.xml?redirect=false&start-index=1001&max-results=500


As Labnol has developed the tool for it also. Just visit the tool page here to get submit blogger map to google yahoo and bing also.For More Help you can read this post also on how to use this tool with an video tutorial.

I hope you will do it easily now.If you still have any problems let me know in comments.I will try to solve them.

TEXT ME ANY QUERY


Copyright 2009 All Rights Reserved Revolution Two Church theme by HackkingAday